The Hall or Nothing blog page, featuring Gloom of Kilforth, 1066, Tears to Many Mothers, Lifeform, and with board game mods for Dungeons and Dragons, Lord of the Rings, etc, by ninjadorg.
Gimli aided Gandalf very little, except by his stout courage. At least he was not, as were most of the others, troubled by the mere darkness in itself.
–The Fellowship of the Ring
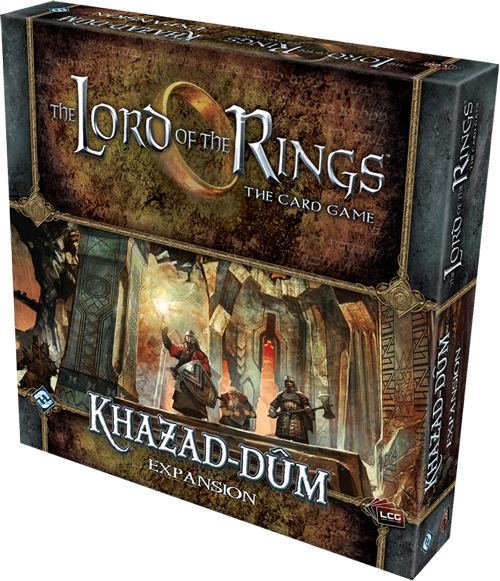
The Khazad-dûm Expansion for The Lord of the Rings: The Card Game takes the game to a whole new level–the subterranean and labyrinthine tunnels of Moria! Within those vast, dark, Dwarven ruins lurk dangers terrible enough to cause even the stoutest adventurers to tremble. Your torch lights radiate a flickering light that spills onto grey stone walls, fading ever into impenetrable shadows. What is worse in that darkness–the endless, echoing silence beyond your footfalls, or a sudden drip or the clatter of falling rocks?
A journey in the dark
Khazad-dûm introduces a number of new Underground and Dark locations. While these new locations immerse you in your heroes’ subterranean journeys through the mines of Moria, they introduce a number of subtle mechanics. InThe Lord of the Rings: The Card Game, each location has a Threat value that represents the potential dangers awaiting your fellowship. Only by thoroughly exploring a location can you be assured it no longer shelters hidden enemies plotting their ambush or that it doesn’t hold some dark secret you may fail to uncover. In the dark of Moria, locations like Branching Paths (Khazad-dûm, 36) are more ominous than ever, and the darker your journeys, the more your fellowship will feel the darkness surrounding them on all sides, laden with hidden threats.
As the game continues to mature and evolve, the design team has found new ways to work with locations, and Khazad-dûm introduces new ways in which locations interact with each other and with other encounter cards. Since the game’s inception, fellowships have had to work to make sure hidden threats in unexplored locations couldn’t mount against them unchecked. The travel phase remains as important as ever; the locations in Khazad-dûm generally pose higher threats to your fellowship and require greater effort to explore than the locations from the Core Set and Shadows of Mirkwood cycle of Adventure Packs. Still, as one might expect travel through the ancient Dwarven realm’s network of dark tunnels to prove difficult and be laden with tremendous threats, one might also expect the Dwarves to be prepared to deal with these threats…
Untroubled by darkness
The Dwarves are miners, metal-smiths, and no strangers to the dark. The darkness troubles them little, and Khazad-dûm provides Dwarf characters with a number of means of progressing more swiftly through the shadows, Underground, and Dark recesses of Moria. While many players have noted how masterfully the Rohirrim excel at traveling and questing aboveground in the Shadows of Mirkwood, the Dwarves will soon take the lead undeground with cards like Untroubled by Darkness (Khazad-dûm, 10) and Ancestral Knowledge (Khazad-dûm, 12).
The Shadows of Mirkwood cycle saw the development of a number of strong deck-building themes, including Rohanand Eagles decks. In the mines of Moria, the remnants of ancient Dwarf culture surrounds your heroes at every step, and Khazad-dûm provides fans many exciting new opportunities to bring these stalwart warriors to life, including two new Dwarf heroes that let you play Dwarves of any sphere of influence.
Look for the Khazad-dûm Expansion to add new adventure and peril to your adventures in Middle-earth. This deluxe expansion for The Lord of the Rings: The Card Game is coming soon!
Legend of Drizzt: Hero Levelling cards for campaign play
The following are the Levelling Hero cards for the Heroes of Legend of Drizzt. They are for use with the Dungeons and Dragons Adventures System campaign rules which can be found here:
And since I can't find an image of Drizzt Vs. Strahd, here's an image of Drizzt Vs. Red Sonja instead:
From the moment LoD was announced I always liked the idea of taking Drizzt Do’Urden up against Count Strahd in his Castle to see what happens. For our group the setting of Castle Ravenloft is always the most interesting and exciting to return to. Thematically it wins out over Wrath of Ashardalon and Legend of Drizzt, and in terms of difficulty you have ridiculously tough encounters that really paste the heroes over time, combined with standard monsters like the Wraith which casually spit out THREE damage at a time. Much more intimidating than WOA or LOD.
Drizzt and Artemis were quickly chosen as heroes by me fellow adventuring buddies, and picking through the leftovers I thought I’d give Jarlaxle a try. So, you know, don’t go looking for any narrative justification of our hero choices here.
It’s worth mentioning that we always use the Treasure Token rules from Wrath of Ashardalon which can seriously handicap your heroes, especially in the early adventures. Basically instead of drawing a normal treasure card you usually end up drawing a measly 100 gold when you kill a monster (always draw treasure cards for beating villains though). When you do finally draw a treasure, even if it’s just a Potion of Healing, you end up dancing a little jig at the prospect. After each adventure you draw three treasures and may buy one with your haul of gold pieces. Usually this results in the untimely murder of all the heroes after one or two adventures. But if you do survive you can start building up your hero over the adventures, which is really satisfying.
Our favourite mini campaign is the triptych of the ‘Search for the Sunsword’ Adventure followed by the ‘Hunt for Strahd Parts 1 & 2’. Search for the Sunsword eases you in nicely and you also get a cool boost – the Sunsword - when you beat it for taking on the next two adventures as the difficulty quickly spikes upwards. Usually.
Last night we staggered into the crypts looking for Sergei’s Tomb and the fabled Sunsword. Or half of it anyway. For some reason we already had half of the sword, and for another reason we didn’t know who had the half that we already had... had. In any case spirits were high as we laughed about our mighty powers and Drizzt called in Guen the friendly panther straight away. We shouted down the passageways at any hidden monsters, goading and verbally abusing the poor, restless dead as they awoke from their coffins and meandered towards us.
Things started off okay, as they always do, a little bit of damage here and there from monsters and nasty encounters with pseudopods and angry butlers and some gone off food which had become sentient. Artemis went exploring and then throwing the revealed monsters for miles so that they’d never bother us – particularly useful against Gargoyles which he can place back on the empty start tile where they just resume their stone forms and sit there.
Then Drizzt decided to start rolling low, like really low. And before we realised it, the monsters started stacking up and duplicate monsters came pouring out of the endless tunnels. As the duplicate monsters activated, their monster friends whom Artemis had thrown back to the start tile began to catch up and before long we were running around fighting for our lives, wishing we’d brought a cleric along for some healing, cursing the stupid treasure token rules and getting generally pummelled and pinballed between monsters all over the dungeon.
Soon enough the 4XP Grey Hag (sitting inside the card sleeve of a Wraith) reared her ugly head from the monster deck and started moaning and throwing lightning at us, Drizzt got immobilised on her tile by a trap – but crucially not adjacent to her, as Jarlaxle I had spent every last utlity, daily and treasure I had, and Guen got taken out by a malicious fireball from a Blazing Squad (Skeleton).
Artemis was faring a little better and managed to level up after throwing a natural 20, then following it with two more natural 20s just to show off, but his misplaced monsters had all but caught up and after Drizzt hit the dirt we had to spend a healing surge. This caused a Young Vampire Villain to appear and start waffling at us with theatrical gesticulations and amateur dramatics level direlogue about how we were powerful, but not that powerful, etc.
Rolling his eyes at the Vampire’s theatrics, and with just a handful of HP left Artemis found Sergei’s Crypt and grabbed the Sunsword. Quickly realising it would be more effective in Drizzt’s multi-attacking hands he begrudgingly handed it over. And then began the race back to the stairway where a frozen Gargoyle sat, waiting to attack.
Our feet beating stone we legged it back through the dungeon, some of us more quickly than others – hello Speed 7 Drizzt. Piling onto the Gargoyle we took him down with a flurry of blows and then formed up on the stairway together. A wandering Ghoul and some nasty friends (baffled discussion arose here: spider is ‘vermin’, but rat swarm is ‘animal’?) charged us at the stairway whilst the Young Vampire could be heard mincing and waltzing through the dungeon somewhere in the near distance.
We fended off the monsters’ attacks and Drizzt’s turn came around, since he was stood on the stairway with the Sunsword we were able to dash up the stairs and back out into the safety of daylight – a victory!
Our slim pickings had procured us a few hundred gold and we nipped back to Barovia for supplies from the moody townsfolk.
“One single Healing Potion? That’s all we can afford?” spat Jarlaxle.
“Be thankful we can afford even that, thanks to your pitiful efforts,” snarled Artemis.
“Can’t we all just get along, guys? Group hug?” beamed Drizzt.
Counting our blessings that we even finished the adventure, we prepped ourselves for part one of the showdown, dubious of the fact that we’d have to take down Strahd’s Villain henchmen before we can even approach the man himself. Considering we’d literally just run away from a weedy little Young Vampire and barely survived things were looking grim. Artemis was level 2 and had his precious extra Daily power, but we were actually lower on treasures than we were before the first adventure.
Holding our breaths we descended once again into the crypts...
Relatively more cautious in our approach we sneaked about, concentrating on trying to take monsters out where possible instead of blindly exploring ahead. A run of black tiles saw us fetch up many of the quest items quickly (Wooden Stakes, Silver Daggers, etc.) but also gave us a nasty run of encounters. Constantly fighting enemies to keep our experience pile stocked for encounter cancelling we stumbled into the Arcane Circle where Strahd’s henchman awaited.
The Zombie Dragon. We decided to stop exploring until we could take him out. Artemis, having the most HP and feeling the most confident whilst boasting of his Parry and Strike power, went toe to toe with Strahd’s pet. Meanwhile Drizzt, Guen and Jarlaxle circled the beast, taking potshots and collecting the remaining quest items, including the currently useless Dimensional Shackles (although in a distant room somewhere, Klak began to cack himself).
Throwing a hissy fit at the sniping heroes, the Zombie Dragon snarled and took a swipe at a passing Guen and sent her back to her home plane of existence.
“Nooo!” squeaked Drizzt. Despite wanting to save our dailies for Strahd we instead decided to run in and blow them all on the Dragon. Clouds of Darkness engulfed the poor thing as Drizzt used Twin Strikes, Artemis duelled it with his magic longsword, and then Jarlaxle launched a bracer of daggers at the beast, spectacularly missing it by miles. Eventually the undead monstrosity went down and we tottered away from its spasm-throwing body.
Collecting our breath, with Drizzt and Jarl on low HP, Artemis explored the next tile only to discover the Secret Stairway where Strahd awaited. A string of events summoned a human cultist to his side (we swap the cultists from WOA for the Kobolds of CR) and the bloody unwelcome Grey Hag appeared again too.
With resources low and HP lower we set about alternately attacking the Count and his allies. With no powers left my attacks against him were going to be pretty ineffectual on account of the Vampire’s healing ability so I took aim at his cultist minion and launched a dagger into its cowled head. As luck would have it I drew a Treasure Token with ‘Treasure’ on it, which meant I could actually draw a treasure card this time. After my little “yay, a treasure” jig I performed an even bigger jig when the Dragontooth Pick (or Dragon Toothpick) turned up: +1 to hit and +1 damage if you roll 19+.
Drizzt and Artemis laid into Strahd and started well enough, especially since we only needed to get him down to 5HP before he turns into mist and we win this scenario (you only get to properly ‘kill’ him in part 2). But our XP had dried up and the Crushing Walls trap came into effect followed by another series of ingenious traps.
Sidenote: every time we fight Strahd we get hammered by Traps in the final confrontation. Every time. I’m sure the encounter deck knows when we find him. Anyway...
Dodging sliding walls and crossbow bolts we continued to fight the good fight and Artemis with his higher fancy shmancy Level 2 Hit Points drew the Count’s attention for the most part whilst Jarl and Drizzt chipped away at him. After a few misses the Count eventually got a grip on Artemis and began to drain his blood. Soon he was no longer the hero with the highest HP which meant the Count turned his attention to Jarl and Drizzt. Activating after every one of our turns meant that the damage we dealt him started to heal when he struck back.
Soon we were fighting a losing battle, and when the Passage of Time encounter card turned up we all dropped down to 1 or 2 Hit Points each. Grinning through bloodstained teeth the Count redoubled his attacks and took Drizzt out. Jarlaxle attacked back valiantly and then the Count took him out too, before turning on a suddenly lonely Artemis.
We took a pause in the action to appraise the situation and allow our pulsing heart rates to subside a little. We rolled up our sleeves, wiped our brows and pressed on.
Artemis attacked Strahd and hit, Strahd was down to 7HP (effectively 2HP because we only needed to get him down to 5).
Strahd and the Hag attacked back and brought Artemis down to 1HP, whilst healing Strahd back up to an effective 3HP.
Jarlaxle spent a surge and stood up, swung for Strahd and rolled a natural 1. Strahd fought back along with a nasty encounter and Jarlaxle went down to 1HP. Strahd now on 4HP.
Drizzt spent the last surge and stood up, swung for Strahd twice and hit him once with the Sunsword, bringing him back down to 2HP. Strahd and the Hag and encounter fought back and Drizzt went down – on Drizzt’s next turn we would now lose.
Artemis attacked Strahd and inflicted 1 damage. Strahd, Jarl and Artemis stood on (effectively) one Hit Point each. Strahd attacked Artemis and missed.
All eyes on Jarlaxle.
Strahd has a ridiculous 19AC. Wielding the Toothpick I’d need an 11 to win the game. If I failed it would be Drizzt’s turn and we’d lose the game instantly.
50/50 chance (about 25/75 when you factor in my terrible dice rolling ’skills’).
Real life Drizzt decided at that very second he needed to go to the bathroom.
Artemis and I sat in silence and waited for his return.
Drizzt came back.
Sat down.
You could hear a pin drop.
So I rolled.
And this song has been stuck in my head ever since:
The Hunt for Strahd Part 2 to follow next week....
“We have done well,” he said. “But in metal-work we cannot rival our fathers, many of whose secrets are lost. We make good armour and keen swords, but we cannot again make mail or blade to match those that were made before the dragon came.”
–Glóin, The Fellowship of the Ring
Dwarves speak of Moria with longing and with dread. Therein lie treasures undreamt and horrors both ancient and powerful. For generations, the Dwarves whispered tales of its wealth, but none dared pass through its doors… until Balin. Taking with him two other members from Thorin’s renowned companions, Balin traveled to Khazad-dûm, passed its doors, and began new works there. At first, their works fared well, and they reported to their kindred outside the Misty Mountains.
When the Dwarves of the northeast no longer receive word from Balin, they call upon some of Middle-earth’s greatest heroes to look for the Dwarf and his fledgling colony. As your heroes explore Khazad-dûm, the first deluxe expansion for The Lord of the Rings: The Card Game, they will discover both the realm’s abandoned riches and its hidden perils.
Riches worthy of song
Flush with 165 new cards (including 3 copies of each new player card), Khazad-dûm contains a wealth of new player cards, enemies, treachery cards, and locations. Its nine encounter sets create encounter decks for its three new scenarios and form the backbone of the upcoming Dwarrowdelf cycle of Adventure Packs. While most of the locations from these encounter sets work together to immerse you in the dark and dangerous passageways that traverse Moria, these new locations also expose new creative ground within the game. When your heroes explore a Plundered Armoury (Khazad-dûm, 34), you have the chance to play a Weapon or Armor attachment from your hand for free. These will be welcome additions to your fellowship as enemies press in upon you from all sides, and the ability to equip your hero with an expensive attachment like Citadel Plate (Core Set, 40) may prove the decisive edge between death and the successful completion of your quest.
Another treasure from Khazad-dûm appears as a player card. Narvi’s Belt (Khazad-dûm, 3) is a fantastic, unique two-cost attachment for the Leadership sphere that will soon prove indispensable in new deck builds, joining the ranks of Steward of Gondor (Core Set, 26) and Celebrían’s Stone (Core Set, 27) as the keystones of different strategies. While the Shadows of Mirkwood cycle introduces Songs that grant your heroes resource icons for each of the four spheres of influence, Narvi’s Belt provides a more efficient means of granting alternate resource icons in any deck with a Dwarfcharacter. Resource versatility results in flexible deck-building, and you may be able to better focus your heroes toward their strengths even as you draw upon the best supporting cards from all four spheres of influence to aid them on their quest.
Uncover the hidden perils of Khazad-dûm
The doors of Khazad-dûm will open soon. In the meantime, keep your eyes peeled for future previews in which we risk a little more light down the mines of Moria…
Frodo saw her whom few mortals had yet seen; Arwen, daughter of Elrond, in whom it was said that the likeness of Lúthien had come on earth again; and she was called Undómiel, for she was the Evenstar of her people. Long she had been in the land of her mother’s kin, in Lórien beyond the mountains, and was but lately returned to Rivendell to her father’s house.
–J.R.R. Tolkien, The Fellowship of the Ring
Fantasy Flight Games is proud to announce the upcoming release of Road to Rivendell, the second thrilling chapter in the Dwarrowdelf cycle of Adventure Packs for The Lord of the Rings: The Card Game!
Having traversed the freezing snows and treacherous mountain pass of The Redhorn Gate, the heroes of Middle-earth continue their winding journey through the hills west of the Misty Mountains. But the way is long and perilous, and dangers await those sent to escort Arwen Undómiel along the Road to Rivendell.
Ambush!
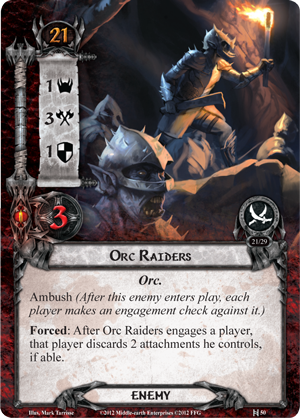
Road to Rivendell introduces a deadly new encounter mechanic, Ambush, that changes the way you encounter enemies and forces the first player to be wary as your heroes tread their way westward and northward through the hills west of the Misty Mountains. Each time an enemy with the Ambush keyword is revealed from the encounter deck, each player makes an immediate engagement check with it, starting with the first player. Enemies with Ambush quickly pounce on players who fail to keep their threat low, and the first player, especially, has reason to tread lightly. In a four-player game, it’s possible to reveal four enemies and watch with terror as your heroes stumble into the middle of their ambush.
Not only does this exciting new mechanic change the way players have to consider who to commit to the Quest and who to leave ready for defense, it makes the Forced effects of some of the new enemies all the nastier. For example, a band of Orc Raiders (Road to Rivendell, 50) forces the discard of two attachments whenever they engage with a player. Woe to the player relying upon a single Citadel Plate (Core Set, 40) to provide Gimli (Core Set, 4) enough additional Hit Points to survive his wounds! Even when you have the additional attachments to discard, you find your options slipping away, and Rivendell seems farther and farther away…
The aid of the Elves
As your fellowship nears the Last Homely House west of the Mountains, Road to Rivendell also presents new support for Elven characters.
The finely-crafted Rivendell Blade (Road to Rivendell, 31) plays on either a hero or an ally, but only if the character is a Noldor or Silvan Elf. As fearsome enemies stage ambushes to waylay your party, each of your Elves armed with a Rivendell Blade can strike true to make short work of their foes, and your party will need to cut through the opposition quickly in order to escort Arwen safely to her father’s home.
Those heroes who start down the Road to Rivendell must be ever on their guard, for their journey is long and fraught with dangers. Begin your journey when Road to Rivendell releases in the first quarter of 2012!
For those of you not already on BGG (and you should be!) this is a great resource for finding and rating official and unofficial scenarios for the D&D games. Plus one more vote and my own Kobold Wars adventure will enter the rankings too... ;)

 In the dark of Moria, locations like Branching Paths (Khazad-dûm, 36) are more ominous than ever, and the darker your journeys, the more your fellowship will feel the darkness surrounding them on all sides, laden with hidden threats.


