
Massing at Osgiliath

Warning: this review contains a whole bunch of spoilers.
After the overwhelming response to my review of the then-new and interesting Hunt for Gollum:
followed by the underwhelming response to my review of the rather disappointing Conflict at the Carrock:
hopefully this review will leave you feeling averagely whelmed.
First off, I haven’t played A Journey to Rhosgobel yet so this is only the third LOTR expansion I’ve experienced so far. But I can categorically state that it is by far the best scenario yet, including the core set scenarios. I didn’t think I’d immediately like a scenario that threatens to be more difficult than Dol Guldur, particularly because Dol Guldur is so badly scaled for solo play. But Massing actually scales nicely and remains challenging (but not impossible) to any number of players.
‘Massing at Osgiliath’ is oozing with more theme and theme-integrated mechanics than ever before. The set up is terrifying: the heroes stumble upon the outrider scouts from an orc horde which is ‘doing something’ at ‘a certain city’, as the title implies. This is brilliantly represented by a starting layout that will have you quaking: 3 enemies PER PLAYER (that’s one for each Hero). Then there’s the uber boss Witch Lord sitting just out of the play area watching you and chuckling at your pathetic efforts the whole time.

As the quest begins, whilst you’re fumbling to get your bearings, draw your cards and drop your resources into play these Scouts start engaging you because two thirds of them have seriously low threat levels. And if you don’t deal with them quickly you’ll be doomed before you know it.
There are the powerful Wolves from Mordor which you will need to feed weak allies to, just to get them out of your hair - they’ll then rip your Ally to shreds and scuttle back into the encounter deck. But if you try and defend against them they’re so strong (Attack 4) they’ll start earnestly ripping your Heroes apart and spreading wounds across your table like they’re going out of fashion.
Then you have the Snaga Scouts which you think you can ignore because they look pretty weak. So you’ll maybe let a few through your ranks undefended? Well, then you’ll have some killer Shadow Effects coming your way too! And this deck doesn’t scrimp on nasty shadow effects.
Finally (for the opening setup at least) you’ve got the Wainriders. You’ll be tempted to leave these guys to deal with later on whilst you get your footing, but that can be disastrous too. Their threat increasing attack is more easily handled early on rather than later, when your threat will already be growing. I’ve even been known to play a Gandalf just to take one of these ostensibly ‘weak’ bad boys out.
That’s before you even get started on the rest of the encounter deck. And whilst some of the FOUR (count em) stages place restrictions on you – e.g. reducing the play of Ally cards - and are indeed very difficult, it never feels unfair (unlike the poor schmuck who has to lose a Hero for half the game in Dol Guldur).
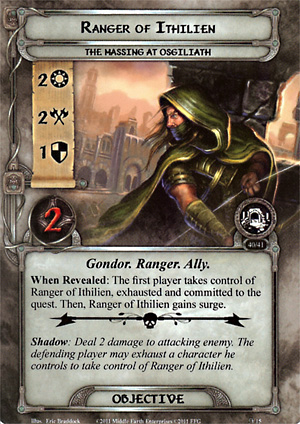
As you’re racing back to the safety of Gondor the orcs pursue you across the Anduin and you’ll be relying on the help of the few surviving Ithilien Rangers spotted about the city. This is one of my favourite LOTR game mechanics yet: not only do they buck the Hero card trend for Allies and emerge from the encounter deck, but they can also come into play through a great shadow effect. If drawn as a Shadow card an Ithilien Ranger will open fire from one of the ruined towers of Osgiliath and deal 2 damage to your attacking Enemy. Then if you have a Hero to lead them (by exhausting) they will come to join you.
The Rangers are a must-have when it comes to crossing the Anduin. By this point, the orc horde is hot on your heels, the staging area is filling up with Captains, Scouts and devastating Locations and you’re struggling to get cards into play fast enough. So, when you get to the river crossing some brave souls are gonna have to stay behind to guard your escape. Cue the Rangers... if you have them. If you don’t have the Rangers with you by this point, you’re in trouble because you’ll need to sacrifice a Hero just to quest your way over the great river.

Once you reach the other side of the river things really go pear shaped! You’ll have an open run across the Pelennor Fields - with the largest Progress requirement for this scenario – and none other than the Witch King himself on your tail. Finding a way to keep him actually engaged with you is vital otherwise he will cause the stage threat to skyrocket. Or if you’re feeling balls-out crazy you can try and take him down. There’s not much more of a satisfying victory in the game so far if you can swing that.
As difficult as this scenario is, you can win through with a little luck and a lot of planning and strategy. The pace of the scenario matches the frenetic nature of the flavour text beautifully and really lends the sense of hopelessness that falls upon Gondor during this time in Middle Earth’s history. You’re not even fighting to win - even if you are victorious you’ve only managed to stay alive a little longer and warn Gondor...


I really hope that at least one of the first cycle of Mirkwood expansion packs can match up to how much fun this scenario is, and for the record I think I prefer getting cool new encounter decks to getting a handful of new hero cards.
No comments:
Post a Comment